
StarkNet is a relatively new network for developers, which can come with challenges. Luckily there’s lots of fantastic documentation, tutorials, and developers willing to help build. Despite this, developers of all abilities will still encounter problems every now and then. One of them was the recent change made to the way contracts are deployed to StarkNet resulting in developers encountering the following error:
Client failed with code 500: {“code”: “StarknetErrorCode.DEPRECATED_TRANSACTION”, “message”: “Deploy transaction is no longer supported.” If you ran into these errors, you presumably cross-checked your constructor inputs and every other debugging process you could think of to no avail…
So what went wrong?
With the recent StarkNet update to 0.10.3, the DEPLOY transaction was deprecated and no longer works.
When StarkNet launched, StarkWare subsidized network usage to allow developers to deploy contracts to the network for free to encourage more developer activity. That meant you never had to pay deployment fees from your StarkNet wallet, like Argent X.
But that leads to a few problems.
If StarkWare subsidizes network usage, there’s no incentive for network Sequencers. Sequencers are StarkNet nodes that execute the Cairo OS program, prove the results, and update the StarkNet state. They’re vital for StarkNet’s security.
With layer 1 blockchains such as Ethereum, transaction fees are paid to incentivize validators, but controversially, up till the point of deprecating the DEPLOY command, deployment to the StarkNet network has been free. If there were no fees, it would mean either one of two things: (1) the network is centralized or (2) the Sequencers run like a loss-making charity.
Neither option scales.
Therefore in order to prevent DDOS (Distributed denial of service) which was recently frequently occurring on the network and to also take a step towards the goal of total decentralization, free deployments had to be completely deprecated.
A consequence of this change meant that the previous means of deploying contracts was deprecated and was replaced by the deploy syscall, which allowed any contract to be imported and used with the Universal Deployer Contract (UDC).
WTF is the Universal Deployer Contract (UDC)?
The Openzeppelin team proposed the Universal Deployer Contract to create a means by which the deploy functionality is moved to an external, specialized deployer contract that can be invoked by any other account contract safely and securely.
In order to keep account implementations simple, with as minimal functionalities as possible, it was decided an external contract that accounts can call to deploy contracts would be a better design choice.
It was also proposed that this external contract be made universal to ensure everyone would use it and also be deployed using deploy_from_zero=TRUE to guarantee to have the same deterministic address across all instances of StarkNet networks, facilitating tooling and interoperability.
With our recent update, you can easily declare and deploy transactions from your Argent X wallet, and in this tutorial, we will guide you through the process before demonstrating the difficult route of explicitly using the UDC.
Declaring and Deploying Contracts with Argent X
Before we get started with declaring and deploying a contract on StarkNet with Argent X, we’re assuming that you're familiar with writing and compiling a basic Cairo contract. If this is new for you and you want to learn more about contracts on StarkNet, we recommend this tutorial.
Below is the basic contract we will be deploying:
%lang starknet
from starkware.cairo.common.math import assert_nn
from starkware.cairo.common.cairo_builtins import HashBuiltin

@storage_var
func balance() -> (res: felt) {
}

@constructor
func constructor{syscall_ptr: felt*, pedersen_ptr: HashBuiltin*, range_check_ptr}(input: felt) {
    balance.write(input);
    return ();
}

@external
func increase_balance{syscall_ptr: felt*, pedersen_ptr: HashBuiltin*, range_check_ptr}(
    amount: felt
) {
    with_attr error_message("Amount must be positive. Got: {amount}.") {
        assert_nn(amount);
    }

    let (res) = balance.read();
    balance.write(res + amount);
    return ();
}

@view
func get_balance{syscall_ptr: felt*, pedersen_ptr: HashBuiltin*, range_check_ptr}() -> (res: felt) {
    let (res) = balance.read();
    return (res,);
}
1. Open your Argent X, and click on the settings icon at the top-right

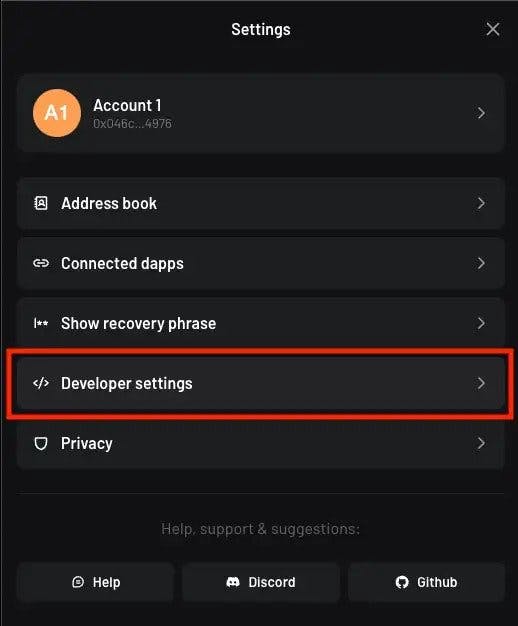
2. Scroll down, and select “Developer settings”
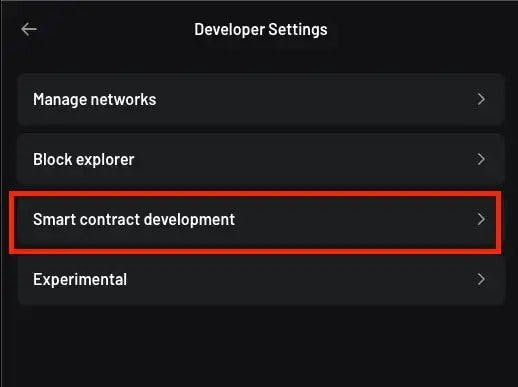
3. Select “Smart contract development”
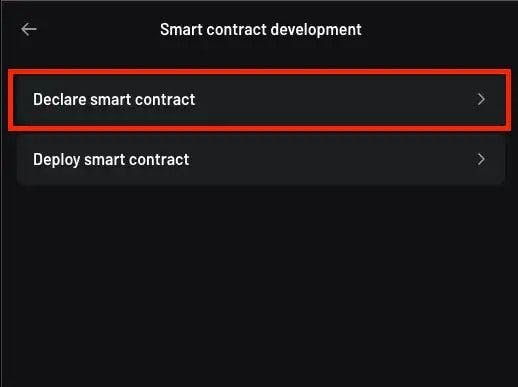
4. To deploy a contract, we need to first get the classhash by declaring the contract. To declare the contract, select “Declare smart contract”
5. Select “Click to upload contract JSON” to upload your JSON ABI which was obtained from compiling our basic.cairo contract
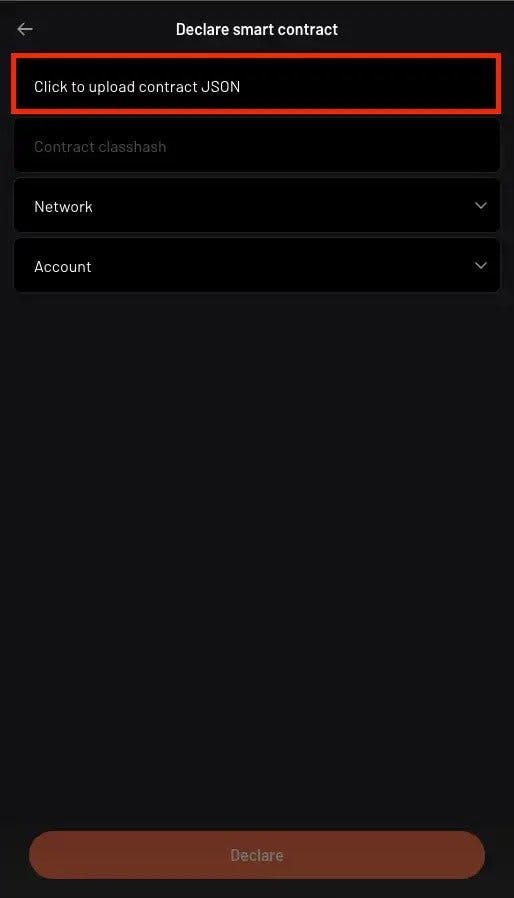
6. You now need to select the network the contract will be deployed on and the account used for deployment, then press Declare. You will need to sign the transaction, and you will be redirected to the page with your contract’s class hash
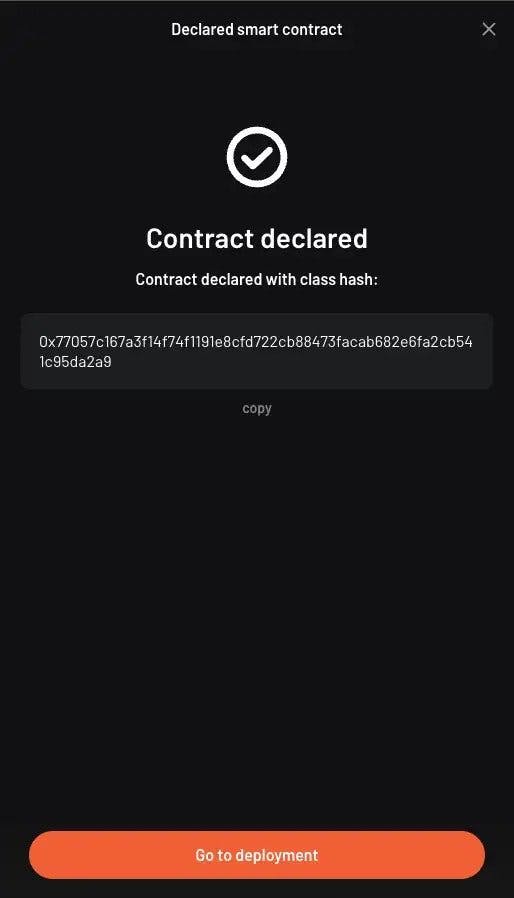
7. Copy the outputted class hash, and select “Go to deployment”
8. Again, you need to select the network the contract will be deployed on and the account used for deployment. Once you’ve done that the constructor input fields will pop up automatically. Fill in the constructor parameters and choose a random salt (5 in our case). You can also use a unique address and finally press “Deploy” button to deploy the contract
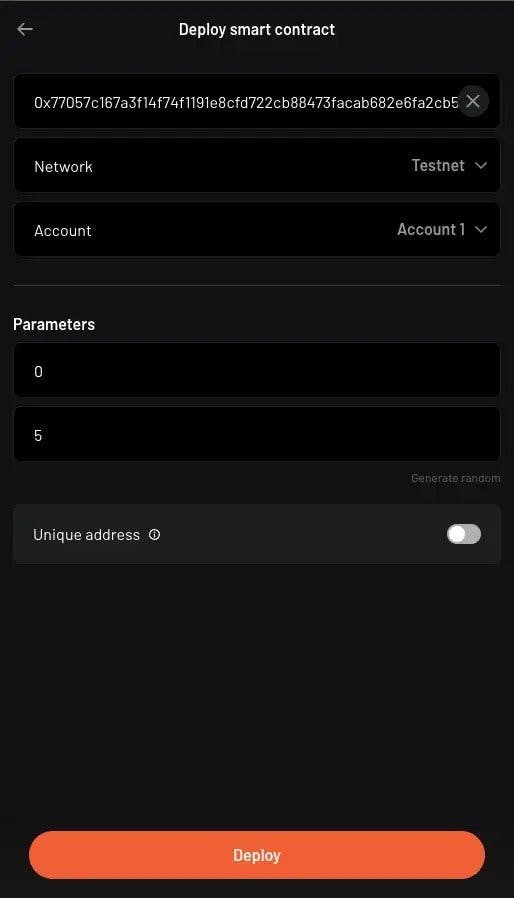
The unique address is an optional field that helps determine if you want to generate an address unique to the deployer which cannot be squatted (address takeovers).
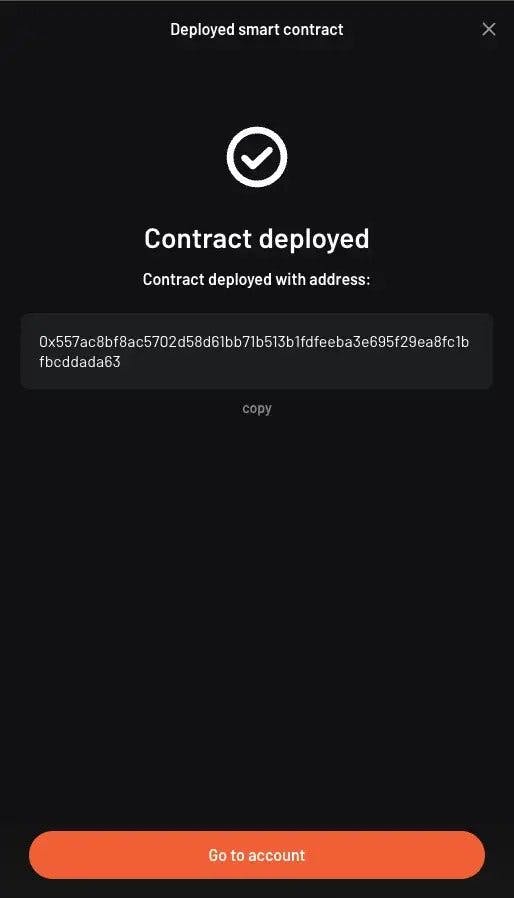
9. Sign the transaction, and you’ll be redirected to a page with your deployed contract address
Deploying Contracts using the Universal Deployer Contract
We’ve just gone through the easiest and simplest way of deploying and declaring contracts on StarkNet. But this isn’t the only option. You can deploy and declare contracts with the UDC, as we’ll now explain.
Just like we did previously, ensure to compile the basic.cairo contract from above to follow along with this tutorial. For this tutorial, we will use Protostar, but the steps are the same, irrespective of the development framework you use.
We will be following 4 simple steps:
- Compiling our contract to obtain the JSON ABI
- Declaring our contract to obtain the contract’s classhash
- Invoking the deployContract function of the UDC, passing in the required parameters
- Check for your contract address in the emitted events
But thanks to Protostar, the number of steps have been simplified to 3, where steps 3 and 4 are performed when the deploy command is called (we will be taking a deeper look at this).
1. Compiling contracts
Compiling your contracts with Protostar is as simple as running the command “protostar build”, but ensure to add the path to the basic.cairo file in your protostar.toml configuration file.
darlingtonnnam@Darlingtons-MacBook-Air tested % protostar build
Building projects' contracts
Class hash for contract "basic": 0x745f2d517414cc07d74fb162fca62492f11eb589189ab74c12c7a535ebac2ec
12:00:26 [INFO] Execution time: 2.16 s
2. Declaring your contracts
Up next, we will need to declare our contracts in order to obtain the contract class hash. To do that in Protostar, run the command below:
protostar declare ./build/basic.json --network testnet --account-address 0x046c5877EE8d297107Bd8E507Fb97b8cAB4ECD6C83892AD92EA40100412b4976 --max-fee auto
Before executing the command above you should set the private key associated with the specified account address in a file, or in the terminal. To set your private key in the terminal, run the command:
export PROTOSTAR_ACCOUNT_PRIVATE_KEY=[YOUR PRIVATE KEY HERE]
You should have your class hash outputted in your screen like this:
darlingtonnnam@Darlingtons-MacBook-Air tested % protostar declare ./build/basic.json --network testnet --account-address 0x046c5877EE8d297107Bd8E507Fb97b8cAB4ECD6C83892AD92EA40100412b4976 --max-fee auto
Declare transaction was sent.
Class hash: 0x0745f2d517414cc07d74fb162fca62492f11eb589189ab74c12c7a535ebac2ec
StarkScan https://testnet.starkscan.co/class/0x0745f2d517414cc07d74fb162fca62492f11eb589189ab74c12c7a535ebac2ec
Voyager   https://goerli.voyager.online/class/0x0745f2d517414cc07d74fb162fca62492f11eb589189ab74c12c7a535ebac2ec

Transaction hash: 0x00c15ec8c5305c2b581df344ae121b1d9c998afdf68f4171c811375ae34b724e
StarkScan https://testnet.starkscan.co/tx/0x00c15ec8c5305c2b581df344ae121b1d9c998afdf68f4171c811375ae34b724e
Voyager   https://goerli.voyager.online/tx/0x00c15ec8c5305c2b581df344ae121b1d9c998afdf68f4171c811375ae34b724e
12:06:54 [INFO] Execution time: 5.13 s
3. Deploying your contracts
Finally, we will deploy our contract to StarkNet. We could simply do this by running the Protostar command:
protostar deploy [classhash] --network testnet --account-address 0x046c5877EE8d297107Bd8E507Fb97b8cAB4ECD6C83892AD92EA40100412b4976 --max-fee auto --inputs 10
And we should get our contract address outputted on the screen.
Invoke transaction was sent to the Universal Deployer Contract.
Contract address: 0x038a40eb43f1d830211512dbd3f6a83c2065b1b91e1056ce9603d12d7d775f85
StarkScan https://testnet.starkscan.co/contract/0x038a40eb43f1d830211512dbd3f6a83c2065b1b91e1056ce9603d12d7d775f85
Voyager   https://goerli.voyager.online/contract/0x038a40eb43f1d830211512dbd3f6a83c2065b1b91e1056ce9603d12d7d775f85

Transaction hash: 483740916302696625162989563270470904410869738490209728461194936287947680474
StarkScan https://testnet.starkscan.co/tx/0x0111c9a3d225eee4b0657eca027b053931826a27689811511d7cee2dec086ada
Voyager   https://goerli.voyager.online/tx/0x0111c9a3d225eee4b0657eca027b053931826a27689811511d7cee2dec086ada
12:09:23 [INFO] Execution time: 3.20 s
Like that, we’ve just deployed our contracts to StarkNet following very simple steps. We never got to interact directly with the UDC as the process was abstracted by Protostar.
Just for the fun of it, let’s interact directly with the UDC.
Invoking the deployContract function
Having declared our contract, we will invoke the deployContract function, but we will need to first inspect its interface to know what parameters it requires.
@external
func deployContract{...}(
    classHash: felt,
    salt: felt,
    unique: felt,
    calldata_len: felt,
    calldata: felt*
) -> (address: felt) {...}
As you can see, it requires we pass in the contract’s classHash, which we already obtained from declaring, a random salt, a unique field (0 for false, 1 for true), the calldata_len (number of constructor arguments), and a calldata array (constructor arguments).
Here’s what our invoke command would look like:
protostar invoke --contract-address 0x041a78e741e5af2fec34b695679bc6891742439f7afb8484ecd7766661ad02bf --function "deployContract" --network testnet --account-address 0x046c5877EE8d297107Bd8E507Fb97b8cAB4ECD6C83892AD92EA40100412b4976 --max-fee auto --inputs [classhash] 13 0 1 1
For more info on Protostar invoke, check the docs here.
If our invoke command goes through, we should get the transaction hash outputted which we would further check for our contract address.
PS: if you run into input validation errors, that’s because the recent Protostar version as at the time of this writing v0.9.0 and below, has some issues with array parsing through the CLI. This should be fixed with the next update.
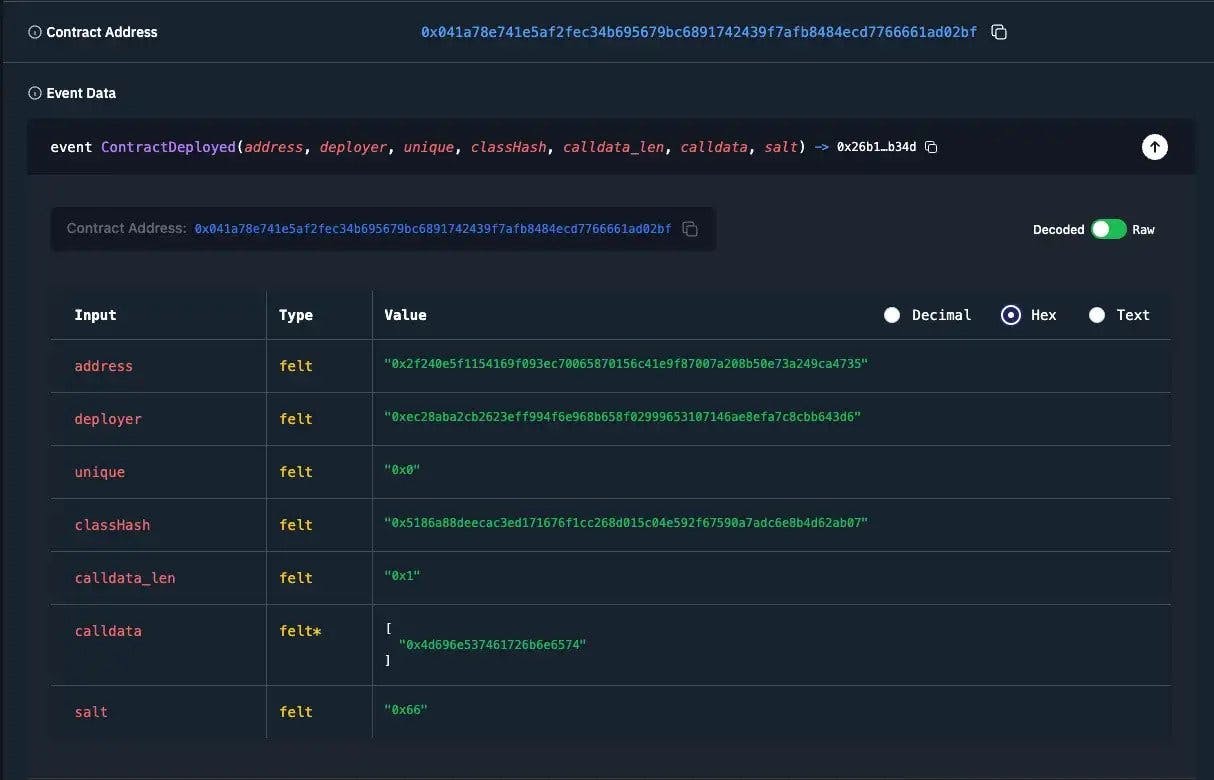
4. Checking emitted events for contract address
Invoking the deployContract command, outputs a transaction hash for the transaction we just carried out. Looking through the UDC codes, we can see the transaction emits an event that contains the newly created contract address:
@event
func ContractDeployed(
    address: felt,
    deployer: felt,
    unique: felt,
    classHash: felt,
    calldata_len: felt,
    calldata: felt*,
    salt: felt
) {
}
Therefore, we can inspect the emitted events from the transaction hash to get the contract address of our deployed contract as seen below:
Conclusion
With our tutorial, you should have a solid understanding of why the DEPLOY command needed to go, how the Universal Deployer Contract (UDC) came into the picture, and how to use your Argent X for no-stress deployments effectively.
If you have any questions about this, reach out to me @0xdarlington, I’d love to help you build on StarkNet with Argent X.
For more developer resources, follow us across our socials:
Twitter — @argentHq
Engineering Twitter — @argentDeveloper
LinkedIn — @argentHq
Youtube — @argentHQ
Interested in the topic? Join us!
We’re always looking for outstanding engineers to help us pioneer better UX and security in crypto. We work remotely across Europe.
Argent Careers

